Posts filed under ‘appetizer’
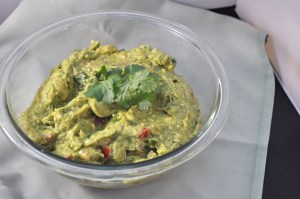
Guacamole

One of our favorite restaurants to dine out at is Cantina Laredo. They make guacamole fresh at your table, and it is the best we have ever tasted. They have a secret combination of spices they use and I have been trying to replicate it for quite some time. I think this version came pretty close. I made a very large quantity for the superbowl, but this can definitely be scaled down to suit your needs.
Guacamole
Ingredients:
5 avacados
Juice of 3 limes
1/4-1/2 red onion, diced
2-3 small tomatoes, seeded and diced
2-3 jalepenos, diced
1/4 cup fresh cilantro, chopped
garlic powder
white pepper
salt
pepper
Directions:
In a medium bowl, mash avacados. Add onion, jalepeno, and lime juice and mix gently. Add spices, salt, and pepper to taste. Gently mix in cilantro. Serve immediately or refrigerate for a couple hours.
Source: Just2Good Original.
Hot Wings With Spicy Butter Sauce

Ok everyone, these wings are life-changing for me. These wings taught me that I do in fact like hot wings. That’s a big deal in our house. My husband is a hot wing lover and me not so much – until now. I don’t fry foods often, but I made an exception for the super bowl. I must say I am so glad that I did. These wings are to-die-for. My husband even said they were the best wings he’s ever had – really!? They were really good. The breading was perfect and the sauce with the basil infused butter really brought this up a notch. If you’re looking for a hot wing recipe these will be sure to please.
Hot Wings With Spicy Butter Sauce
Ingredients:
Vegetable oil, for frying
3 lbs chicken wingettes
4 eggs
1/4 cup heavy cream
2 tablespoons cayenne pepper
2 tablespoons salt
1 tablespoon freshly ground black pepper
2 cups all-purpose flour
1 cup cornstarch
For the spicy butter sauce:
1 cup hot sauce (recommended: Frank’s Red Hot)
1 cup (2 sticks) butter
1 lemon, juiced
1 small bunch basil
Salt
Directions:
In a large pot, heat vegetable shortening until a deep-fry thermometer reaches 375 degrees F. Line a sheet tray with a wire rack.
In a large bowl, whisk together eggs, cream, cayenne, 1 tablespoon salt and black pepper. In a paper bag, shake together flour, cornstarch and 1 tablespoon salt. Place chicken in egg mixture and toss well to coat. Place chicken in batches in the bag of flour mixture. Shake well to coat. Set on wire rack to let coating set, 20 minutes.
In a small saucepan, bring the ingredients for the Spicy Butter Sauce to a simmer. Remove from heat and let basil infuse in butter for at least 15 minutes. Remove basil.
When oil is at the right temperature, add chicken, working in batches, and fry until cooked through and crispy, about 13 minutes. Season chicken with salt then immediately toss in the spicy butter sauce. Serve Immediately.
Source: Sunny Anderson via the Food network
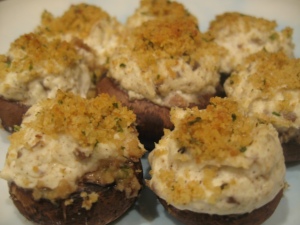
Sausage Stuffed Mushrooms
Do you have a food you could eat over and over again and never get tired of it? For me, one of those would be mushrooms. I haven’t always loved mushrooms, but they are one of my favorites now. I love them in all forms, but I especially love stuffed mushrooms. I didn’t follow a particular recipe here. Instead, I just looked in the fridge to see what I had left over and mixed up a delicious combination. These aren’t unique or different, but they were very good and will definitely be my preferred method for stuffed mushrooms.
Sausage Stuffed Mushrooms
Ingredients:
14-15 mushroom caps
1/2 lb bulk sausage
1/2 c. yellow onion, chopped
1/2 c. fresh flat leaf italian parsley
1/2 c. grated parmesan cheese
3-4 ozs cream cheese, softened
1/4 c. panko bread crumbs, plus extra for sprinkling
1 clove garlic
olive oil
Directions:
Preheat the oven to 350 degrees F. Wipe off the mushroom caps with a clean towel; set aside.
Heat oil over medium heat in a skillet. Brown sausage until cooked through, add onion and saute until transparent; about 3-5 minutes. Add garlic and saute until fragrant. Remove from heat and set aside.
In a separate bowl combine cream cheese, parmesan, panko, and parsley. Add in the sausage mixture and stir to combine. Spoon mixture into mushroom caps and place cap side down into a baking dish. Sprinkle with remaining panko Bake for 15-18 minutes until mushrooms are tender and filling is bubbling and panko is golden brown.
Source: Just2Good Original
Bean Salad
 Before Alana was born my friend Jenn gave me a wonderful baby shower. Several people that attended brought dishes to share and Adrian brought this bean salad. While I was pregnant I couldn’t eat beans due to the horrible heart burn that I sufferred so I initially passed right by this salad. After several people told me I had to try it I finally did and it was delicious! I was really sad I couldn’t eat more of it, but you better believe that it is now a staple in our house. We eat it as a snack, served over fish, in taco salads, and just by itself. You name it we’ve probably tried it. This recipe makes a lot, but it keeps well in the fridge. My 13 month old is even crazy about this salad!
Bean Salad
Ingredients:
1 can white shoepeg corn
1 can red kidney beans
1 can garbanzo beans
1 can black beans
1 can black eyed peas
6 green onions, chopped
2 bell peppers (any color)
3 large tomatoes, diced
1 medium red onion, diced
broccoli florets, cut into bite-sized pieces
2 packages Good Seasons italian salad dressing
vegetable or canola oil
red wine vinegar or apple cider vinegar
water
1 package of taco seasoning or 3-4 Tbps homemade
tobasco or other hot sauce, to taste
Directions:
Rinse and drain the beans and corn. Place into a large bowl. Add green onions, bell peppers, tomatoes, red onion, and broccoli florets to the bean mixture.
In a 2 cup measuring cup mix up the Good Seasons Italian dressing per directions (using oil, vinegar, and water) add 1 pkg taco seasoning, and tobasco to taste. Mix dressing well and pour over veggie mix. Refrigerate for several hours or overnight. Serve with tortilla chips, over fish, in a salad, etc.
Source: my friend Adrian T.
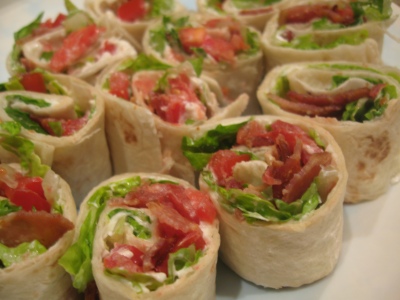
BLT Roll-Ups
My husband and I are American Idol fans and this week he asked me to make snacks to eat during the show. Since, I normally don’t eat too much after dinner this really mean snacks for him! That’s ok though, it gave me a reason to try a new recipe I have saved. Earlier in the week, when I asked Joe if he had any dinner requests he asked for BLTs so I thought this would be a perfect way to give them to him! I snuck one since I like to try everything I write about and I would definitely make these again. They are simple, delicious, and would be a definite crowd pleaser.

BLT Roll-Ups
Ingredients
3 8 or 9 inch flour tortillas
3 oz. cream cheese, softened
1-2 tbsp. Ranch dressing
6 pieces bacon, cooked and crumbled (I used turkey bacon)
1/2 cup shredded lettuce
1 large tomato, diced
Ranch dressing for dipping, if desired
Directions:
Lay all three tortillas out on a work surface. Combine the cream cheese and range dressing in a small bowl and mix until smooth. Spread a thin layer over each tortilla. Sprinkle lettuce, tomato, and one-third of the bacon over each tortilla. Starting at one edge, roll each tortilla in a tight spiral log. Slice into 1-inch sections. Serve with ranch dressing, if desired.
Source: Annie’s Eats
Baked Onion Rings
We love onion rings in this household. Unfortunately, they are terrible for you and I rarely eat them. That is until now. I must say, I was pretty skeptical that these would be just that good, but I stand corrected. My onion loving husband even proclaimed these better then deep-fried onion rings — really!? Wow. I will be making these over and over again.

Baked Onion Rings
Ingredients
3 Tbsp flour
1 Tbsp sugar
1 tsp chili powder
1 tsp ground cumin
1/2 tsp salt
1/2 tsp paprika
1/4 tsp ground allspice
1/4-1/3 Cup milk (enough so the mixture stays thick enough to coat onions)
2 Large Vidalia onions, cut into 1/4 in. thick slices. Use the outer rings and save the inner for another meal
1 1/2 Cups dry bread crumbs
Cooking spray
Directions
Preheat oven to 450 degrees F. Combine everything except the breadcrumbs and onions in a large bowl. Dredge the onion rings in flour/milk mixture. Then coat with breadcrumbs in a separate bowl.
Source: Delicious Melicious
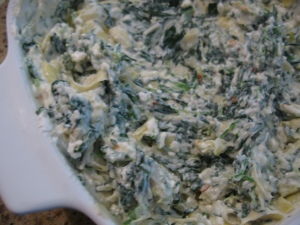
Spinach-Artichoke Dip
This is my favorite dip – no contest. I have made several variations and they are always good, but none have been as good as this recipe. I have heard raves about it for quite some time and I’m not sure what took me so long. I should’ve known Alton wouldn’t fail me. I had a small altercation when making this recipe — I was out of sour cream! I threw in some cottage cheese instead and it was great. In fact, I might continue to make it that way. This dip is warmed in the microwave which is great when you have other things occupying your oven. If you haven’t tried this recipe yet give it a try. You will not be disappointed!

Alton Brown’s Spinach Artichoke Dip
Ingredients
1 Cup chopped frozen spinach, thawed
1 1/2 Cups chopped canned artichoke hearts
6 oz cream cheese, softened
1/4 Cup mayonnaise
1/4 Cup sour cream (I used cottage cheese)
1/3 Cup grated parmesan
1/2 tsp red pepper flakes
1/4 tsp garlic powder
1/4 tsp salt
Directions
Thaw spinach and squeeze all of the water out, set aside. Heat cream cheese in a microwave safe bowl for 1 minute, or until hot. Stir in rest of the ingredients, serve warm.
This can also be made ahead of time and reheated when ready to serve.
Source: Food Network
Brie and Caramelized Onion Tartletts
Last week Joe and I decided to do an appetizers for dinner night. I made some old favorites along with stuffed mushrooms and these wonderful little creations. I had been hearing wonderful things about them and since they involved my favorite cheese it was a go. These were to die for. I can’t wait to make them again.
I had to modify this recipe a bit since I don’t own mini-muffin pans, but I think they still turned out beautifully. The mini tartletts would be better for a larger group of people, but making them in regular muffin tins worked out perfect for the two of us.

Brie and Caramelized Onion Tartletts
Ingredients
for the tart shells:
5 oz cream cheese, softened
3/4 Cup butter, softened
1 1/2 Cup flour
1/2 tsp salt
For the filling:
3 medium onions, sliced thinly
4 slices bacon, finely diced
1 tsp sugar
1/2 tsp salt
2-3 tsps balsamic vinegar
2 Tbsp finely chopped fresh sage (I used dried and cooked it with the onion)
Freshly ground black pepper
1/4 Cup cream or half and half
1 large egg
4-6 oz brie, rind removed
Directions
Heat a large nonstick saucepan over medium heat and cook the bacon, stiring often, until almost crisp. Add the onions, sugar, and salt, and cook, stirring often until they cook down by two-thirds, about 10 minutes. Add 2 tsp vinegar, reduce the heat to medium-low, and continue to cook until the onions are golden brown and softened to a marmalade consistency, 30-45 minutes. Stir often and scrape up any brown bits. The onions will need constant stirring near the end to prevent them from sticking and burning. They will sizzle when they need attention. Stir in the sage, allow them to cool slightly, season with pepper and additional salt if needed. If the onions are too sweet add another tsp of vinegar.
Blend cream cheese and butter. Stir in flour and salt until incorporated. Roll into little balls and place in greased mini muffin tins (or regular muffin tins). If using mini muffins you should get 36 and if using regular muffin tins you should get 18-22. Using a tart shaper, press dough into muffin tins to form little shells, flouring the tart shaper when necessary. Chill for about an hour.
Preheat the oven to 325 degrees F. Stir cream or half and half and the egg into the onion mixture. Place a piece of brie in the bottom of each tartlett. Divide the onion filling evenly among the chilled tart shells. Bake until filling is set and dough is lightly browned, about 20 minutes.
Cool and remove from pans. Serve warm or at room temperature.
Source: Smells Like Home
Stuffed Mushrooms
Ahh, mushrooms. My favorite vegetable. I love mushrooms so what do you suppose my favorite appetizer is? Mushrooms in any form, of course! Joe especially loved these mushrooms because they had a little “kick” to them as he likes to say. I could only only eat a few since I’m a big baby when it comes to spicy things, but I thought they were delicious. I especially liked Cate’s idea of adding a sprinkle of toasted breadcrumbs on top. I thought it added the perfect crunchy contrast to the cream cheese.

Stuffed Mushrooms
Ingredients
24 whole fresh mushrooms
1 tablespoon olive oil
2 tablespoons minced garlic
2 (8 ounce) package cream cheese, softened
1/2 cup grated Parmesan cheese
1/2 teaspoon ground black pepper
1/4 teaspoon ground cayenne pepper
1 1/2 tsp butter
1/3 cup bread crumbs
Directions
Preheat the oven to 350 degrees F. Spray a baking sheet or glass casserole dish with cooking spray.
Clean the mushrooms with a damp paper towel and carefully break off the stems. Chop the stems extremely fine making sure to discard the tough end.
Heat oil in a large skillet over medium heat. Add garlic and chopped mushroom stems to the skillet. Saute until any moisture has disappeared making sure not to burn the garlic. Set aside to cool.
Meanwhile, melt the butter in a small saucepan. Add the bread crumbs and toast, stirring, until the bread crumbs are golden brown.
Once the mushroom mixture is cooled, stir in cream cheese, parmesan cheese, black pepper, onion powder, and cayenne pepper. Mixture will be very thick. Using a small spoon, fill each mushroom cap with a generous amount of stuffing. Arrange the mushroom caps on the prepared baking sheet and sprinkle with toasted bread crumbs. Bake for 20 minutes in the preheated oven, or until the mushrooms are hot and liquid starts to form under the caps.
Source: Fresh from Cate’s Kitchen
Bacon wrapped Jalepeno poppers
I thought these were a great alternative to deep-fried poppers and a great addition to our movie night! I am admittedly a baby when it comes to spicy things. I usually carry on and on about my mouth burning, but for some reason I always go back for more. These were no different, Joe likes things really spicy so I kept some of the membrane and seeds in the peppers which really added some extra heat.

Bacon Wrapped Jalepeno poppers
Ingredients
Fresh jalepenos 2-3 inches in size
cream cheese, softened
bacon, sliced into thirds
1/2 Cup shredded sharp cheddar (I added)
Directions
Cut the jalepenos in half length wise. Using a spoon remove the seeds and white membrane, leaving some in the peppers if you like the heat. In a medium bowl combine cheeses. Spread cream cheese mixture into each jalepeno half. Wrap each pepper with a slice of bacon and secure with a toothpic.
Bake in a pan with a rake at 375 degrees for 20-25 minutes. Serve immediately.
Source: The Pioneer Women

