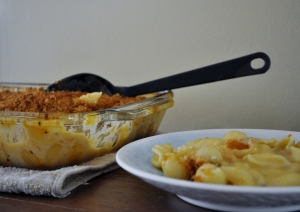
Classic Mac and Cheese
There aren’t too many mac and cheese recipes that I try and actually love. I keep searching ad trying new recipes hoping that one day I will find the perfect version. When I saw this Cook’s Illustrated version I figured it was worth a shot since they never let me down. I was pleased with this version and would definitely make it again. It’s makes a very large batch and I think next time I would bake in two smaller pans and freeze one for a quick weeknight meal.
Classic Mac and Cheese
Ingredients:
bread crumb topping (see below)
salt
1 pound pasta shapes
6 Tbsp unsalted butter
2 medium garlic cloves, minced
1 tsp dry mustard
1/4 tsp cayenne pepper
6 Tbsp all-purpose flour
2 1/4 cups low-sodium chicken or vegetable broth
3 1/2 cups milk (low-fat is fine)
1 pound colby jack cheese, shredded (about 4 cups)
8 oz extra-sharp cheddar, shredded (about 2 cups)
ground black pepper
Directions:
Preheat the oven to 400 degrees.
Bring water to a boil in a large dutch oven set over high heat. Add 1 tablespoon of salt and the pasta, and cook, stirring occasionally, until the pasta is just beginning to soften, about 5 minutes. Drain the pasta and leave in the colander.
Wipe the pot dry, and add the butter, and set it over medium heat until melted. Stir in the garlic, mustard, and cayenne, and cook until fragrant, about 30 seconds. Stir in the flour, and cook, stirring constantly, until golden, about 1 minute. Slowly whisk in the chicken broth and milk, and bring to a simmer. Whisking often, cook until large bubbles form on the surface and the sauce is slightly thickened, about 15 minutes. Remove from heat and stir in the cheeses until completely melted. Season with salt and pepper to taste.
Stir the drained pasta into the cheese sauce, breaking up any clumps, until well combined. Pour into a lightly greased 9×13 inch baking dish and sprinkle with crumb topping.
Bake uncovered, until the sauce is bubbling and the crumbs are crisp, 25-35 minutes.
To store and serve later: Wrap the dish tightly with foil, and refrigerate for up to 2 days. To serve, bake in a 400 degree oven until the filling is hot throughout, about 40-45 minutes. Remove the foil and continue to cook until the crumbs are crisp, 15-20 minutes.
Bread Crumb Topping
Ingredients:
4 slices white sandwich bread, quartered
2 Tbsp unsalted butter, melted
2 Tbsp minced fresh parsley
salt and pepper
Directions:
Preheat the oven to 300 degrees.
Pulse the bread and butter in a food processor to coarse crumbs, about 6 pulses. Spread the crumbs out over a rimmed baking sheet. Bake, stirring occasionally, until golden and dry, 20-30 minutes. Let the crumbs cool, then toss with parsley and season with salt and pepper to taste.
Source: Cook’s Illustrated Best Make Ahead Recipes via Pink Parsley
Creamy Taco Mac
This recipe has been floating around all over the blogosphere and for good reason – it’s really tasty! This dish is supposed to be a spin off of its pre-packaged counterpart hamburger helper. I’ve never had the hamburger helper version so I can’t compare, but this version is so good that I’d be willing to bet it blows the other out of the water. Homemade vs. store bought? I don’t even think there can be a comparison. This is also a great week night meal!
Creamy Taco Mac
Ingredients:
1¼ lbs. ground turkey
8 oz. dry pasta shapes
1 small onion, chopped
1 clove garlic, minced
1 (14 oz.) can diced tomatoes, drained
4 tbsp taco seasoning
3 oz. cream cheese
½ cup sour cream
Salt and pepper
Shredded cheddar cheese (optional)
Directions:
Bring a large pot of water to boil. Cook pasta according to the package directions. Drain, reserving ½ cup of pasta water. Set aside.
Meanwhile, in a large skillet or sauté pan, cook the ground turkey over medium-high heat until no longer pink. A few minutes before the turkey is cooked through, add the chopped onion to the skillet. Once the turkey is cooked through, mix in the garlic and cook until fragrant, about 30 seconds. Mix in the diced tomatoes and taco seasoning and let simmer over medium heat for about 5 minutes. Stir in the cooked pasta, cream cheese, sour cream and reserved pasta water, and continue stirring until the cream cheese is melted and the sauce is well blended. Season with salt and pepper to taste. Simmer over medium-low heat 3-5 minutes to reduce the sauce a bit. Remove from the heat and top with shredded cheddar cheese, if desired.
Source: Annie’s Eats
Spring Green Risotto
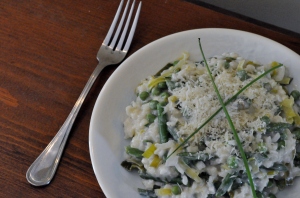 Why is it when flipping through cookbooks there are certain recipes that just get overlooked for one reason or another? This was definitely the case for this recipe and I’m not sure why. I have flipped through Ina’s Back To Basics book countless times and I can’t say this recipe ever really stood out to me. Maybe because there are so many other wonderful recipes waiting to be tried? Whatever the reason, I’m glad this one finally caught my eye. I knew that this would be a definite winner in my book, but I wasn’t sure about my meat-loving husband. I was pleasantly surprised when he couldn’t stop raving about this risotto and immediately asked if he could take the leftovers for lunch the next day. This will be making more appearances in our home!
On another note, this was my first time cooking risotto with homemade chicken stock. I have been making a lot of it lately and have stockpiles in the freezer (recipe to come soon!). I really think it made a more flavorful risotto (and it saves money too!).
Spring Green Risotto
Ingredients:
5 cups chicken broth or stock
1½ tbsp. olive oil
1½ tbsp. unsalted butter
1 small onion or two shallots, minced
3 cups chopped leeks, white and green parts (about 2 leeks)
1½ cups Arborio rice (medium grain rice)
2/3 cup dry white wine
1 lb. asparagus (thin spears preferable), cut into 1-inch pieces and tough ends discarded
10 oz. frozen peas (or 1½ cups shelled fresh peas)
1 tbsp. freshly grated lemon zest
2 tsp. kosher salt
1 tsp. pepper
2 tbsp. freshly squeezed lemon juice
1/3 cup mascarpone cheese (or cream cheese)
½ cup freshly grated Parmesan cheese, plus extra for serving
3 tbsp. minced fresh chives
Directions:
In a medium saucepan, heat the chicken broth or stock over medium heat until simmering. Reduce the heat to medium-low, keeping the stock warm.
Heat the olive oil and butter in a large sauté pan over medium heat until the butter is melted. Add the onions or shallots and leeks to the pan and sauté for 5-7 minutes, until tender. Add the rice to the pan and stir to coat well with the oil and butter, cooking for about 1 minute. Add the white wine and simmer over medium-low heat, stirring constantly, until most of the wine has been absorbed. Add the chicken stock, 2 ladles at a time, stirring almost constantly and waiting for the stock to be absorbed before adding more.
Meanwhile, blanch the asparagus in boiling salted water for 4-5 minutes, until crisp-tender. Drain and rinse immediately with cold water to stop cooking. (If using fresh peas, blanch them in boiling water for a few minutes as well.)
When the risotto has been cooking for 15 minutes, add the asparagus and peas to the risotto. Stir in the lemon zest, salt and pepper. Continue cooking and adding stock, stirring almost constantly, until the rice is tender but still firm. The entire process should take about 25-30 minutes.
When the risotto is done, remove the pan from the heat. Mix in the lemon juice, mascarpone, Parmesan and chives. Stir until the cheeses are melted in and the risotto is creamy. Serve immediately with additional Parmesan, if desired.
Source: Ina Garten: Back to Basics
Chicken Tortilla Casserole
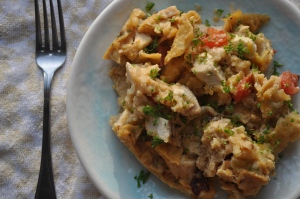
I’m a Mom, wife, and a busy grad student. Some days that doesn’t leave much time for cooking. One of my priorities is that I put a nice meal on the table for my family every night. But, some days I just don’t have a lot of time or I don’t want to dirty every pot and pan in my kitchen while making our dinner. This is where this casserole comes in. It’s a one-dish meal that is quick, easy, and has excellent flavor. We all loved this meal and I believe Joe kept raving about how delicious it was. This meal will definitelybe enjoyed over and over in our home.
Chicken Tortilla Casserole
Ingredients:
2 boneless, skinless chicken breasts, butterflied into halves (4 halves total)
2 tbsp. vegetable oil, divided
1 shallot, minced
2 cloves garlic, minced
1-2 tbsp. minced chipotle peppers in adobo sauce
1 3/4 cups chicken broth
5 cups tortilla chips, broken into large pieces
2 tomatoes, seeded and diced
4 oz. sharp cheddar cheese, shredded
2 tbsp. chopped fresh cilantro
Directions:
Pat the chicken breast halves dry and season with salt and pepper. Heat 1 tablespoon of the vegetable oil in a 10-12 inch oven-safe skillet over medium-high heat. Add the chicken to the pan and cook until golden brown on both sides (chicken does not need to be fully cooked at this point.) Transfer to a plate and set aside.
Add the remaining oil, shallot, garlic, chipotle, and ¼ teaspoon of salt. Cook just until fragrant, about 30 seconds. Add the chicken broth, scrape the browned bits from the bottom of the pan, and bring to a simmer.
Stir in half of the tortilla chips. Nestle the chicken into the broth and cook over medium-low heat until cooked through (reading 160° F on an instant-read thermometer), about 10 minutes. Transfer the cooked chicken pieces to a cutting board and shred into bite-sized pieces when it is cool enough to handle.
Return the shredded chicken to the skillet with the tomatoes, ½ cup of the shredded cheddar cheese, and 1 tablespoon of the cilantro. Stir in the other half of the tortilla chips until they are incorporated and moistened.
Sprinkle the remaining cheese on top and place the pan under the broiler until the cheese is melted and browning, about 2-3 minutes. Top with remaining cilantro and serve, allowing the casserole to cool 5 minutes before serving
Source: Annie’s Eats, originally from Cooks Illustrated
Cinnamon Roll Pancakes
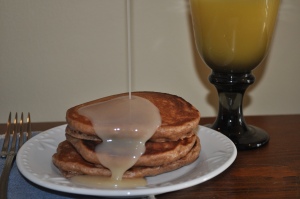 Say hello to the most delicious pancakes ever. I realize this is a strong statement, but it is the truth. The pancakes themselves are perfectly fluffy and with the addition of cinnamon and maple glaze puts these pancakes over the top. The first time I made these my supposed pancake-hating husband devoured them. I constantly crave these pancakes, but due to the butter content, I reserve them for a once in awhile treat.
Cinnamon Roll Pancakes
Ingredients for the pancakes:
1 1/2 Cups all-purpose flour
3 Tbps white sugar
1/2 tsp salt
4 tsps baking powder
1 Tbsp cinnamon
2 eggs, beaten
1 cup milk
2 Tbsp corn syrup
1/4 cup butter, melted
1 Tbsp vanilla
ingredients for the glaze:
1 cup powdered sugar
1/4 cup butter, melted
dash of salt
1 Tbsp maple syrup
1/4 whole milk*
Directions:
In a medium bowl, combine the flour, sugar, salt, baking powder, and cinnamon. Whisk to combine.
In a separate bowl, beat together the eggs, milk, corn syrup, butter, and vanilla. Stir flour mixture into the egg mixture.
Heat a lightly greased griddle over medium/low heat. Pour about a 1/4 cup of batter onto the griddle. Brown on both sides.
To make the icing whisk together the powdered sugar, butter, salt, maple syrup, and milk until combined.
Serve pancakes warm with icing drizzled on top.
*I have tried making the glaze with fat-free milk and the consistency and texture is not the same. I recommend using whole milk for this recipe.
Source: Pioneer Woman
Weeknight Bolognese
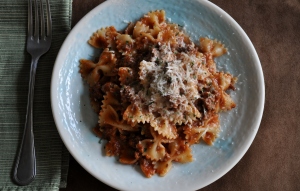
One of my favorite meals growing up was pasta with meat sauce. My Mom would make it for me quite often and it was always a treat. I still enjoy that now, but am always looking for new variations. I absolutely love this recipe because it is quick and delicious. I was actually quite surprised by how flavorful it really was. Bonus – only 2 pots are dirtied! It definitely satisfies that pasta craving and tastes like it took a lot longer to make.
Weeknight Bolognese
Ingredients:
1 lb lean ground sirloin
4 cloves minced garlic
1/2 Tbs dried oregano
1/4 tsp crushed red pepper flakes
1 1/4 cups dry red wine, divided
1 (28-oz) can crushed tomatoes, preferably San Marzano
2 Tbs tomato paste
kosher salt and ground black pepper
3/4 lb dried pasta, such as shells or oricchiette
1/4 tsp ground nutmeg
1/4 cup chopped fresh basil leaves, lightly packed
1/4 cup heavy cream
1/2 cup freshly grated Parmesan cheese, plus more for serving
Directions:
Add the sirloin to a large skillet over medium-high heat. Cook, crumbling the meat with a wooden spoon, 5-7 minutes, until the meat has started to brown and is no longer pink. Stir in the garlic, red pepper flakes, oregano, and tomato paste and cook for 1 more minute, or until fragrant.
Pour 1 cup of the wine into the skillet and stir to scrape up any browned bits. Add the tomatos 2 teaspoons of salt, and 1 teaspoon of pepper, stirring until combined. Bring to a boil, lower heat, and simmer 10-15 minutes.
Meanwhile, bring a large pot of salted water to boil. Add the pasta and cook until al dente. Drain and pour into a large serving bowl.
As the pasta cooks, finish the sauce. Add the nutmeg, basil, cream, and remaining 1/4 cup wine. Simmer for 8 to 10 minutes, stirring occasionally until thickened. Add the sauce to the pasta, along with the Parmesan cheese, and toss well. Serve hot and pass additional Parmesan at the table.
Source: Pink Parsley
Spinach, Green Onion, and Smoked Gouda Quiche
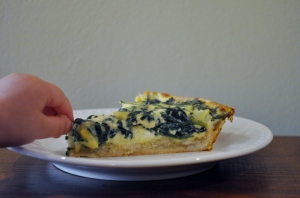
I was quite skeptical as I was making this quiche. The dough was quite crumbly and not perfect as the original recipe stated. I was very close to scraping the whole process and starting a new dough, but I decided to go with it and see what happened. I’m glad I did because the texture of this dough was spot on. It didn’t roll out beautifully and create a perfect crust, but the taste was phenomenal. After all, that’s what is really important, right?
The combination of green onions, spinach, and gouda is delightful and a welcomed change of pace in our home. As you can see from the photo above – my toddler approves!
Spinach, Green Onion, and Smoked Gouda Quiche
Ingredients
For the crust:
6 tablespoons unsalted butter, softened
2 tablespoons milk
heaping 1/4 teaspoon salt
1 large egg yolk
1 1/4 cups all-purpose flour
For the filling
1 tablespoon extra-virgin olive oil
1/2 cup thinly sliced green onions
1 garlic clove, minced
3 cups fresh baby spinach
1 cup milk
3 large eggs
4 ounces (about 1 cup) shredded smoked Gouda cheese
3/4 teaspoon salt
pinch fresh grated nutmeg
Directions:
for the crust
In a large mixing bowl, beat butter until smooth and creamy.
In a small bowl, whisk together milk, salt and egg yolk. Add milk mixture to butter, 1 tablespoon at a time, beating well after each addition. Add flour and mix just until combined. Scoop mixture out onto a piece of plastic wrap and press into a 4″ circle. Cover well and chill for 1 hour.
Preheat oven to 350 degrees.
Remove dough from the refrigerator and unwrap. On a lightly floured surface, roll dough to a 10″ circle. Gently transfer and fit dough into a 9″ pie plate – place into the freezer and chill for 15 minutes. Place pie plate into the oven and bake until lightly browned, about 20 to 25 minutes. Remove and allow to cool.
for the filling
In a large skillet, heat oil over medium-high. Add onion and cook until softened, about 4 to 5 minutes. Stir in garlic and cook until fragrant, about 1 minute. Add spinach and cook until wilted, about 2 minutes.
In a medium bowl, whisk together milk, eggs, cheese, salt and nutmeg. Stir in spinach mixture. Pour filling into crust – place into the oven and bake until the center has set, about 30 to 35 minutes. Remove and allow to cool slightly before serving.
Source: Culinary in the Desert
Grilled Flank Steak with Chimichurri Sauce
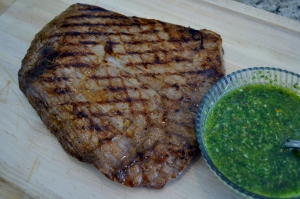
I made this recipe on a whim one Saturday evening. I have talked about our favorite Mexican Restaurant before and I love the chimichurri they serve. This definitely satisfied our taste buds and allowed us to enjoy this classic at home. The original recipe calls for parsley so if you aren’t a cilantro fan parsley could easily be subbed. I enjoy both so I am eager to try this again using parsley.
Flank Steak with Chimichurri Sacue
Ingredients:
For the steak
3 lbs flank steak
1/3 cup white vinegar
½ cup soy sauce
4 cloves garlic, minced
2 limes, juiced
½ cup olive oil
1 tsp salt
1 tsp ground black pepper
1 tsp ground white pepper
1 tsp garlic powder
1 tsp chili powder
1 tsp dried oregano
1 tsp ground cumin
1 tsp paprika
For the chimichurri
1 cup firmly packed parsley or cilantro, trimmed of stems
3-4 cloves of garlic
2 Tbsp fresh oregano or 2 tsp dried oregano
½ cup olive oil
2 Tbsp red or white wine vinegar
1 tsp kosher salt
¼ tsp freshly ground black pepper
¼ tsp red pepper flakes
Directions:
Lay the flank steak in a large dish. In a medium bowl, whisk together the vinegar, soy sauce, garlic, lime juice, and olive oil. Season with salt, black pepper, white pepper, garlic powder, chili powder, oregano, cumin, and paprika. Whisk until well blended, then pour over the steak. Turn once to coat both sides. Cover with plastic wrap and marinate for 1-8 hours.
To make the chimichurri combine the cilantro, oregano, and garlic in the bowl of a food processor. Pulse several times. Stir in the olive oil, vinegar, salt, pepper, and red pepper flakes. Adjust seasonings to taste. Serve immediately or chill for several hours, making sure to bring sauce to room temperature before serving.
Prepare a grill or grill pan over medium heat. Grill steak approximately 3-4 minutes per side (depending on your preferred temperature).
Serve immediately with chimichurri.
Source: flank steak adapted from Allrecipes, Chimichurri from Simply Recipes
Strawberry Spinach Salad
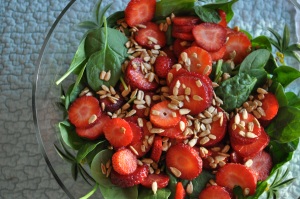
I’m not sure why this happens, but every spring I start enjoying spinach salads, we eat them throughout the summer, and every fall and winter they disappear. Maybe because this particular version is my favorite and strawberries aren’t plentiful in the winter? Whatever the case, I’m sure glad it is spring time and this salad has found its way back onto our table. It’s fresh, light, and a great alternative to the traditional side salad.
Strawberry Spinach Salad
Ingredients:
2 Tbsp sesame seeds
1 Tbsp poppy seeds
½ cup white sugar
½ cup olive oil
¼ cup white wine vinegar
¼ tsp paprika
¼ tsp Worcestershire sauce
1 Tbsp minced onion
10 ounces fresh baby spinach
1 quart strawberries – cleaned, hulled, and sliced
sunflower kernals (for garnish)
Directions:
In a medium bowl, whisk together the sesame seeds, poppy seeds, sugar, olive oil, vinegar, paprika, Worcestershire sauce, and onion. Cover, and chill for one hour.
In a large bowl, combine the spinach, strawberries, and almonds. Pour dressing over salad and toss. Refrigerate 10-15 minutes before serving.
Source: Allrecipes
